
Queen's Domain Bosses: The Three Named Fights and How to Read Them
Every confirmed Queen's Domain boss: Black Skeletal Butcher, Noble Sentinel and The Necronomicon, with arena notes, punish windows and setup advice.
Queen's Domain does not put a boss name on screen until the fight starts, and it does not explain the arena. The launch build confirmed three named encounters: the Black Skeletal Butcher, the Noble Sentinel and The Necronomicon. Each one is less a damage check than a geometry check, and each punishes a different bad habit.
This page covers what is confirmed about those three fights, the arena rules that transfer to the rest of the game, and the setup that makes a first attempt survivable. It does not invent attack lists for bosses we have not seen; where a pattern is still being documented, it says so.
The rules that apply to every boss
Before the individual fights, four things are true in every arena:
- There is no dodge roll. You cannot i-frame through an attack. You walk, jump, or commit to the dash attack, which has no invincibility.
- Stamina is the real health bar. A boss cannot kill you while you have stamina and space; it kills you when you spend the last of both.
- The arena is part of the moveset. Corridors deny circling, platforms deny retreat, open voids deny cover. Read the floor before the boss.
- Throwables are free damage. They run on cooldown, not ammo, and they are the only attack you can land while repositioning.
Drinking an elixir is a commitment. Do it after a boss commits to a long recovery, not while it is walking toward you. The save points page explains how the runback works if you misjudge it.
Black Skeletal Butcher
Arena: a purple-lit corridor, narrow enough that a straight backpedal runs out of room.
What it is: a skeleton with a great axe, first encountered in the demo's deeper route. Its identity is the wind-up: the axe goes up, the body leans, and the swing covers the corridor rather than a point. The follow-through is where the fight is won or lost.
How to fight it:
- Circle toward the weapon side. The axe's arc leaves a pocket on the side it swings from; walking away from the weapon keeps you in the arc.
- Do not retreat in a straight line. The corridor ends, and the axe's forward step closes the gap faster than your backpedal.
- Punish after the floor hit, not during the wind-up. The recovery is short; one light attack and a reset is the correct trade.
- Throw during the walk-back. The boss's approach is slow enough for one throwing cooldown.
The Butcher is the fight that teaches the game's core defensive idea: move around the attack, not away from it. If you are dying against the wall, you are fighting the arena instead of the boss.
Noble Sentinel
Arena: a seaside stone platform with a hard edge and very little cover.
What it is: a shield-and-plate knight. The shield is not decoration; it changes which parts of the boss are hittable and turns a front-facing trade into a bounce. The platform's edge is the second enemy.
How to fight it:
- Do not attack the guard. Wait for the shield to commit to a bash or a step, then hit the exposed side.
- Keep the centre. The edge is a death sentence against a boss with forward pressure; fight in the middle third of the platform.
- Use impact. A shield enemy is the natural place to test whether your impact weapon actually staggers. The weapons page explains the damage-type split.
- Respect the recovery. The Sentinel's punish window is shorter than the Butcher's. One hit, then reset.
The Sentinel is the fight that punishes greed. If you try to convert every opening into a full string, the shield recovers first and you eat the bash.
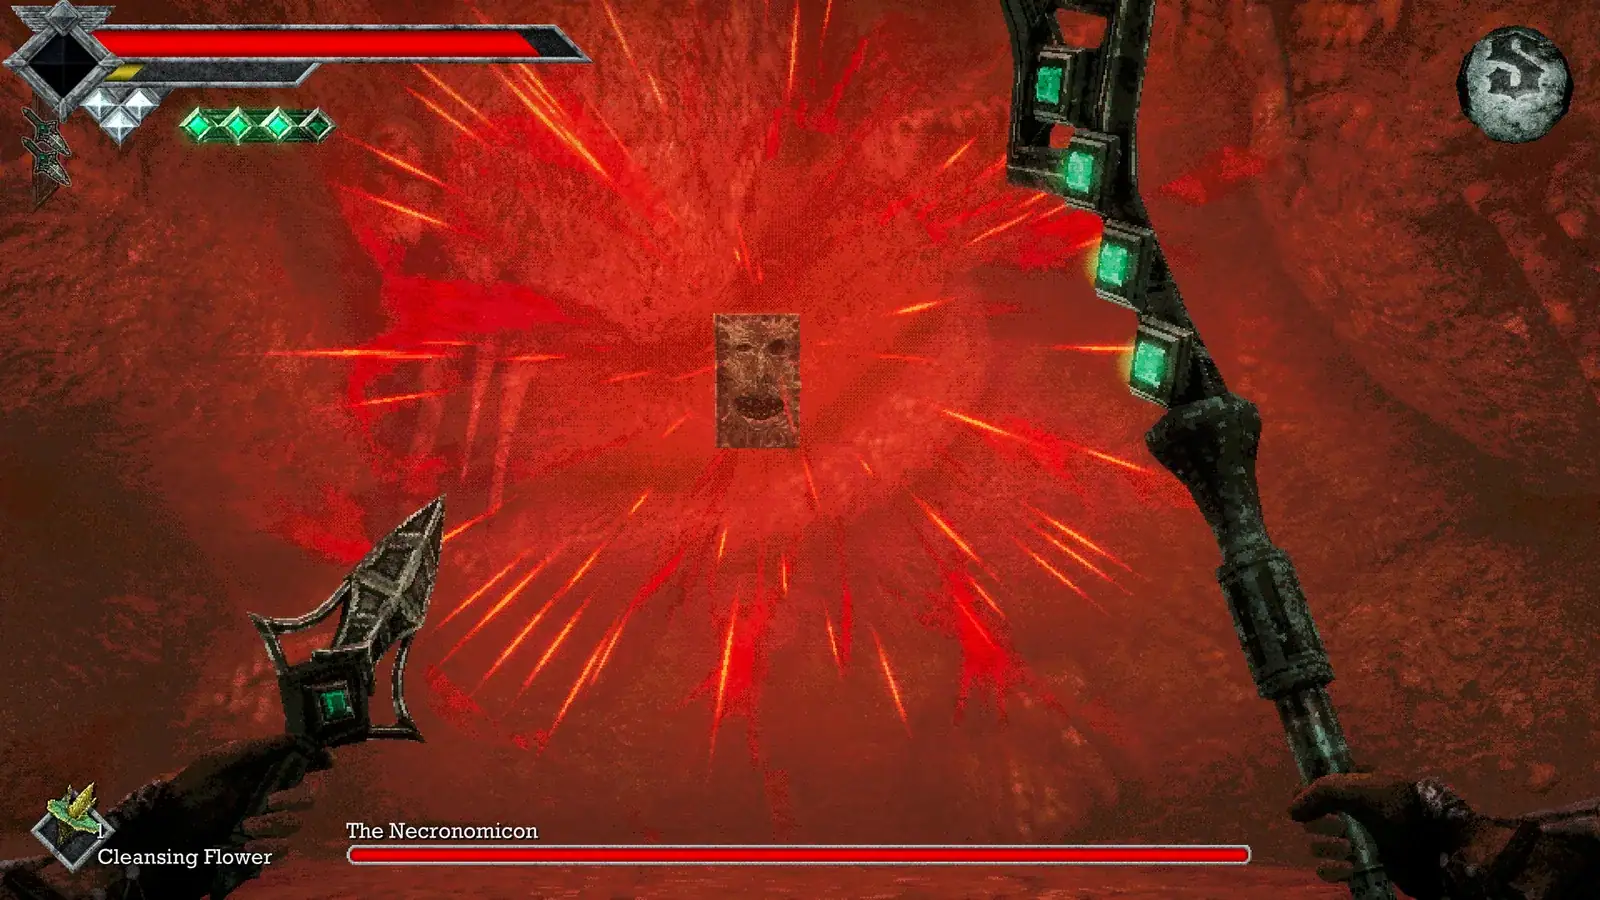
The Necronomicon
Arena: a red void with a floating book and a face at the centre, and enough open floor to strafe continuously.
What it is: the most visually distinct encounter in the launch material and the most projectile-heavy of the three. The book's pattern fills the arena rather than chasing you, so the fight is about lane discipline.
How to fight it:
- Strafe the outer ring. The pattern leaves a safe lane away from the centre; hugging the book is how the fight becomes a wall.
- Do not sprint. Sprinting burns the stamina you need for the one punish after each pattern.
- Count the volley, then move in. The gap after a full pattern is the only reliable melee window.
- Keep a fast throwable. The distance between the outer ring and the book is exactly the range where throwing weapons earn their slot.
The Necronomicon is the fight that teaches patience with a ranged boss. There is no secret weakness to discover mid-fight; there is a lane, a count, and a window.
Boss order and runbacks
The three fights above are confirmed, but their order is not something we will state as universal. The demo route reaches the Butcher first; the full game's route can reach the Sentinel and the Necronomicon from different directions. Treat the order as route-dependent, not as a fixed ladder.
Runbacks work the same way everywhere:
- Rest at the nearest crystal monument before the drop or the door.
- The mausoleum lever opens a one-way floor; you cannot climb back out of that arena.
- Dying returns you to the last monument, and regular enemies can respawn on the way back.
- Clear the approach once, then stop fighting it. Running past is usually correct.
If a runback is longer than two minutes, you probably missed a monument. The map page marks the region connections, and the save points page explains the respawn rules in detail.
Setup before a first attempt
- One melee weapon you have actually tested. Damage number is less important than the special attack's range and recovery.
- One throwable with a fast cooldown. Daggers are the default; a heavier throwable is for stagger, not for this.
- Full consumables. Elixirs, cleanse items and a stat meal. Do not save them for "later"; the boss is later.
- A damage type you have not been using. The Sentinel's shield and the Butcher's bone armour are both there to make a single-type build uncomfortable.
- Empty purse, full stomach. Spend at the outpost before the drop; food buffs do not care about your gold.
The build guide turns that list into three concrete loadouts, and the combat guide covers the stamina math behind the one-hit-and-reset rule.
What is not confirmed
We have not documented a full attack list for any boss beyond the patterns visible in the launch build, and we have not confirmed a final boss name or an ending sequence. If a guide tells you the exact HP values or a complete move list on day one, treat it as suspect. This page will be updated as the fights are recorded, and the bestiary will hold the regular enemy data that supports them.
Sources
Official source: Queen's Domain on Steam — official store page with the feature list, PC requirements and launch details.
- Queen's Domain review — The Wand Report — 9/10 launch review of the combat, exploration and King's Field lineage.
- Queen's Domain is a brilliant King's Field-alike RPG — Rock Paper Shotgun — launch-day review of the traversal, the flying sword and the island's secrets.
FAQ
How many bosses are in Queen's Domain? The store description promises 100+ enemies, mini-bosses and bosses combined. Three named bosses are confirmed in the launch build; the full count is not published.
Can I parry bosses? No parry system has been confirmed. The defensive tools are spacing, jumping and the dash attack, none of which grant invincibility.
Are bosses weak to a specific damage type? The game tracks slash, pierce and impact, and shields/bone armour suggest resistances. Exact multipliers are not published; carry one of each and test.
Do bosses respawn? Bosses do not respawn after a clear in the demo. Regular enemies can respawn after a death or a rest.
More Queen's Domain Guides
Every verified Queen's Domain demo secret: the dagger-slot tombstone, the hidden meal, the secret shop, Wourha's archive key and five achievements.
A complete Queen's Domain demo walkthrough: the shore route, the library detour, the burial-area puzzle and the skeleton boss, plus every demo achievement.
The Queen's Domain FAQ: release date, platforms, price, game length, co-op, demo saves, respec, endings, map, Steam Deck and the Souls comparison.
Queen's Domain food explained: which meals raise stats, which items only heal, where the Roasted Ojum Lizard fits and when to eat before a boss.
How the Holy Sword Endu works in Queen's Domain: the shoulder-button flight, how upgrades extend distance, and how to read a gap before you jump.
A practical Queen's Domain map: the confirmed regions of the Isle of Neasied, how they connect, one-way drops and navigating without a map screen.
Queen's Domain is out now, October 30, 2026, on PC, PS5, Xbox Series and Switch 2. Price, launch discount, length, demo and Steam Deck status.
A roundup of Queen's Domain reviews and previews: the 9/10 Wand Report verdict, RPS on its King's Field lineage, and the criticisms worth knowing.